As of late at whatever point I play a YouTube video on my Windows 7 PC, it's rough, jerky, skippy – whatever you get a kick out of the chance to portray it. It plays and stops each other second or so which made me insane.
After some examines on this issue, I discovered 6 conceivable answers for settle the uneven video issue. What's more, one of these helps me play YouTube video back to ordinary. So it is certainly worth after the courses beneath in case you're tormented by the same uneven playback in YouTube.
Section 1: Evaluate the Cause of Choppy Video
Section 2: Solutions to Fix Choppy YouTube Videos
Section 1:Evaluate the Cause of Choppy Video
The main conceivable reason for this issue is the moderate web association. In the event that you have moderate web association, it might be insufficient to cushion the video in realtime while you are watching it.
The second reason is identified with the equipment. On the off chance that you are utilizing a PC you purchased ten years prior and have not been updated with more RAM or a superior processor, then this will prevent the YouTube video playback.
The last conceivable reason is the web program issue. This may identified with a few settings of your default web program. You can attempt to change the program to settle the issue.
See Also: How to Fix Choppy YouTube Video in Google Chrome
Section 2:Solutions to Fix Choppy YouTube Videos
1. Change to the snappier Internet association
On the off chance that you are certain the system association is poor, you can change to another snappier Wi-Fi.
2. Switch the web program
You can attempt to switch an alternate program to check whether playback is better. Attempt Firefox, Chrome or Internet Explorer.
3. Upgrade Adobe Flash to the most recent variant
The dominant part of video gushing gateways utilize Adobe Flash to stream the recordings. Google Chrome and Internet Explorer 11 on Windows 10/8 deliver with an inherent Flash Player. Every other program require the Flash module which you can download from the Adobe site. In the event that you have the Adobe Flash introduced, ensure you have upgraded it to the most recent adaptation.
Adobe Flash Player
4. Download YouTube Video to your PC
YouTube has changed the way recordings are cushioned. The recordings don't support totally any longer, however stop to cradle once you delay it.
Without buffering, you can straightforwardly download YouTube recordings and afterward watch them on your PC.
5. Drop the quality
YouTube chooses a video quality consequently for you. Be that as it may, you can change the determination physically by tap on the Settings catch. Attempt to lessen the quality and check whether it takes care of the video jerky issue.
Drop YouTube Video Quality
6. Change to HTML5 video
Some video facilitating locales offer HTML5 video playback notwithstanding Flash. On YouTube, you have to visit the http://www.youtube.com/html5 page and join the HTML5 test to utilize the component.
Most exceptional programs bolster HTML5 and it might resolve issues that you are confronting, particularly on the off chance that they are Flash related.
Monday, February 20, 2017
Thursday, February 16, 2017
How to: Fix ″Couldn't Refresh Feed″ Instagram Error
Instagram works fine for more often than not. Be that as it may, at times we get the "Couldn't Refresh Feed" mistake message out of no reason. We may open the application on iPhone of course, yet when attempting to invigorate the bolster of most recent photographs, the blunder message shows up: "Couldn't Refresh Feed." It is irritating. So here we have a few traps to settle this irritating Instagram blunder.
Instagram Not Refresh Feed Error
1. Organize Connectivity
The most conceivable explanation behind this blunder is brought about by system detachment. In this way, on observing the mistake, the main thing you ought to do is to check your system association.
Check whether your Wi-Fi/portable system is associated. Regardless of the possibility that there is system associated, the Instagram blunder still could happen if the system flag is powerless. So open a page in the program, if the page stacks gradually, it demonstrates a frail system flag. Consequently you may utilize Instagram later when the system flag is solid or switch between cell information and Wi-Fi information to check whether the other one works better.
Check iPhone Network Connection
Instagram official help focus likewise gives two conceivable clarifications for this stacking trouble blunder.
Versatile information sum confinement: in the event that you tend to experience with the issue toward the finish of every month, the nourish blunder is likely brought on by your portable transporter restricting your portable information after a specific measure of information utilization in a month. Contact your portable transporter for the issue.
Over-burden versatile system association: you may run over the mistake when many individuals attempt to utilize a portable system at the same time, for example, in a show or ball game.
2. Restart Your Phone
In the event that "Couldn't Refresh Feed" mistake keeps coming up after the above deceives, you may restart your telephone and check whether it could settle the issue. It may not work for everybody, but rather it worth an attempt.
3. Instagram App Update or Re-establishment
Obsolete variant of Instagram application may have bugs that cause the reviving food trouble. It is recommendable to stay up with the latest since the most up to date form more often than not have settled the known mistakes.
In the event that you as of now have the freshest Instagram on your iPhone or Android telephone, you may settle the mistake by re-introducing the application. To iPhone clients, press the hold down the Instagram symbol until all symbols wiggle with the little x showing up on the upper left. Tap on the little x of Instagram symbol and snap "Erase" if a message requests that whether erase the application.
Uninstall Instagram on iPhone
That is about the investigating of this "Couldn't Refresh Feed" blunder. On the off chance that the issue holds on, you could help the issue settled by detailing the mistake to Instagram: on Instagram, tap setting symbol > "Report a Problem" > "Something Isn't Working" and depict your issue
Battery Percentage Bar Display on Marshmallow
In the event that you are a fortunate proprietor who has an Android telephone/tablet that takes a shot at Marshmallow, you can appreciate such a variety of new and easy to understand highlights offered by Google OS. When playing with your gadget, you can without much of a stretch find new components other than making your gadget indicate battery rate in the status bar as a matter of course. In this way, in today's post, we will demonstrate to you proper methodologies to show battery rate on Marshmallow telephone, no gadgets or outsider applications required.
Marshmallow: Display Battery Percentage in the Bar
Step 1. Empower System UI Tuner
Swipe down the Quick Setting Pane of your Android telephone, Google Nexus 5 for instance. At that point long press the settings catch (the little rigging symbol) at the upper-right corner. Furthermore, hold for up to 5 seconds.
Empower System UI Tuner
Following 5 seconds, let go. You will see the note, which peruses, "Well done! Framework UI Tuner has been added to Settings".
Framework UI Tuner Added
Step 2. Go to "Settings". At that point look down and discover "Framework UI Tuner" in the classification of System.
Framework UI Tuner
Step 3. In the page "Framework UI Tuner", you will have the alternative of "Show inserted battery rate". Change to flip the catch. At that point the telephone will demonstrate battery level rate inside the status bar symbol when not charging.
Demonstrate Embedded Battery Percentage Off
Presently you can see the battery rate bar show on Marshmallow passage for when the Android is charging.
Demonstrate Embedded Battery Percentage On
Note.
Nobody can see the battery rate bar when it is charging. But that, the status bar is noticeable.
Before you go, you can likewise look at more sections about Android battery, for example, settle an Android that won't charge appropriately.
How to Play MP4 in Windows Media Player
"I am not ready to play MP4 video documents in WMP (Windows Media Player) 11. It says these documents are not bolstered by WMP. Would you be able to recommend a cure."
You may have loads of recordings and films in MP4 design since MP4 is nearly the most well known video organize that can be played on different interactive media gadgets like iPhone, iPad, Android, PSP and that's only the tip of the iceberg. Notwithstanding, in the event that you need to play MP4 in Windows media Player, you'll be fizzled, on the grounds that MP4 documents are not locally upheld by WMP. Snap to realize what record sorts are upheld by Windows Media Player.
How to Play MP4 Files in Windows Media Player?
To settle "MP4 won't played on Windows Media Player", you can essentially change over MP4 to Windows Media Player exceedingly good WMV or AVI recordings.
FonePaw Video Converter Ultimate is recently the privilege MP4 to Windows Media Player converter which can change over a wide range of MP4 records to WMP upheld video designs like WMV, AVI, ASF and MPG. In addition, this product can change over different Windows Media Player unsupported configurations like MOV, MKV, VOB, 3GP, AVCHD, OGG, M4A, M4R and more to WMP upheld video or sound organization. Check a case of changing over MOV to WMV on Windows and Mac.
How to Convert MP4 to Windows Media Player Format?
Make readiness: Free Download the trial rendition of FonePaw Video Converter Ultimate and run it on your PC.
Windows Version DownloadMac Version Download
1. Include Windows Media Player unrecognized MP4 video
Tap the "Include File" catch to import the MP4 records to this program.
Include Windows Media Player Unrecognized MP4
2. Select WMP bolstered design as yield profile
Tap the little triangle to one side of "Profile" to choose Windows Media Player more good video like "WMV - Windows Media Video (*. wmv)" and "AVI – Audio Video Interleaved (*. avi )" from the "General Video" classification.
Select WMP Supported Format as Output Profile
3. Alter recordings (Optional)
Before transformation, you can alter MP4 documents. Click "Alter" catch, then you can cut, trim, modify the splendor/differentiate/immersion of the video, and include content or picture watermark, and so forth.
Alter Video Files
4. Change over MP4 to Windows Media Player arrange
At the point when all done, tap the enormous blue "Change over" catch to begin and complete MP4 to WMP organize transformation with high caliber and quick speed.
Fix YouTube Fullscreen Not Working on Firefox, Chrome and Safari
Comparable with YouTube dark screen issue, rough YouTube video issue, another irritating inconvenience frequently announced by YouTube clients is the "YouTube Fullscreen Not working". Clients don't confront any issue while viewing YouTube recordings until they empower the full screen method of YouTube. Along these lines, you might be no ready to appreciate YouTube motion pictures in full screen.
YouTube Won't Work Full Screen
This is a typical issue that can occurred on different programs particularly Google chrome, Firefox and Safari. Also, there are many aides online to help you make sense of it, yet none is in that mush points of interest. In this post, we will impart to you detail manage on the best way to settle YouTube fullscreen issue on Chrome, Firefox and Safari.
Section 1: Fix YouTube Fullscreen not Working on Chrome
Section 2: Fix YouTube Fullscreen not Working on Firefox
Section 3: Fix YouTube Fullscreen not Working on Safari
Section 4: Download YouTube Videos to Computer and Watch without Fullscreen Problem
Section 1:Fix YouTube Fullscreen not Working on Chrome
Google Chrome is a standout amongst the most prevalent web programs, so we should start with settling the YouTube full screen issue on chrome. The settle could be shockingly simple.
1. Simply go to your Chrome address bar, sort "chrome://modules" and hit "Enter", you'll see a rundown of all introduced modules.
2. At that point, tap the "Subtle elements" catch.
3. Look down and discover "Adobe Flash Player." If you see 2 Adobe Flash Players, skip to next stride. In the event that there is just a single, you have to download another Adobe Flash Player. Open an alternate program, similar to IE or Firefox and go to adobe.com and take after the guideline to download and introduce streak player.
4. Backpedal to Chrome module page and locate the Flash module with the line and snap "Handicap". Impairing this blaze player permits the program to utilize the most recent glimmer form that you have introduced on your PC.
Impair Flash Player
5. Restart Chrome to check whether all is well.
Another Solution: Update your program to utilize the HTML5 YouTube player
On the off chance that Flash just won't work legitimately on your PC, you can take a stab at viewing YouTube in HTML5 rather than Flash. Simply go to YouTube's HTML5 Video Player page and tap the Join the HTML5 Trial interface.
Join YouTube HTML 5 Player
Section 2:Fix YouTube Fullscreen not Working on Firefox
On the off chance that you can watch YouTube recordings yet you can't see them in full screen, then it might have an issue with the Flash player and your video drivers.
1. Above all else, please overhaul Firefox to the most recent rendition.
2. Visit Adobe's test pageto check whether the Flash module is introduced and working appropriately. If not, introduce or redesign Flash.
Introduce Flash Player on Firefox
Section 3:Fix YouTube Fullscreen not Working on Safari
1. Go to Finder > Applications. Look down your applications list until you discover the Safari Right-tap the Safari symbol and pick Get Info from the setting menu.
2. Tap the check box by "Open in 32-bit mode". At that point, close and exit out of Safari Info window.
Open 32-bit Mode
3. Dispatch Safari and explore Safari > Reset Safari > Reset to reset Safari.
On the off chance that the above arrangement did not settle the YouTube issues, you ought to next take a stab at uninstalling and reinstalling Flash player.
I seek these 4 settle after "YouTube fullscreen not working" issue worked for you. On the off chance that despite everything you have the issue while viewing YouTube in full screen, you can leave remarks underneath
Use Filter Effects on iPhone Camera to Take Amazing Photos
We've as of now examined about the HDR mode and the burst mode in iPhone camera, now how about we investigate the inherent channels offered by your iPhone camera. In the event that you are not kidding about iPhone photographs and appreciate utilizing a wide range of channels in your pictures, don't race to search for other top notch photography applications to get distinctive channels, you can have a considerable measure of fun utilizing the implicit channels in your iPhone camera too.
9 Different Camera Filters
9 Filters
• Mono: Lowered brilliance highly contrasting
• Tonal: Basically the default setting however stripped of immersion
• Noir: High difference highly contrasting symbolism
• Fade: Lightened picture with lower immersion
• None: No channel, the Camera application default
• Chrome: Brightened picture with higher immersion
• Process: Semi-washed out picture with a blue shade
• Transfer: Somewhat over uncovered warm shade
• Instant: Retro lit up picture with a yellow shade
Shoot Photos with Filters from iPhone Camera App
Rather than altering photograph with channels from the Photos application, you can apply ongoing channels to the photograph you are forming with the Camera application. Here is the means by which to do it:
1. Dispatch the Camera application on iPhone, then you ought to see three white circles in the base right corner. Tap on the three circles.
Bring Photo with Live Filters
2. 9 channel impacts will show up, and you can pick a channel from the live review by taping on it. That channel will be connected to the photograph you are forming.
3. Take the photograph as regular and the photo will be spared to your Camera Roll with the channel connected.
See Filters
Apply Filter Effects to Pictures You've Captured Already
1. Dispatch the Photos application, and tap on a photograph you might want to alter.
2. On the photograph review screen, tap on Edit from the upper right corner.
3. Tap on the three circles again and select a channel to be connected.
4. Tap on Done to apply the channels.
Tuesday, February 14, 2017
iPhone Won't Send Pictures in Text
Address: I have an iPhone 6 that I as of late moved up to the new iOS 9.3 beta from Apple, yet for reasons unknown my iPhone won't let me send pictures through content. So is there a setting some place that I'm absent?
Reply: iPhone without a doubt bolsters sending pictures by means of MMS or iMessages. On the off chance that your iPhone won't send pictures in content, my figure is you don't have MMS empowered on your telephone. Likewise, this issue might be brought about by the system, the bearer et cetera. Here I've discovered some reasonable approaches to investigate this issue.
Section 1: Fix iPhone Won't Send Photo by means of MMS
Section 2: Fix Picture Not Being Send by means of iMessage
iPhone won't send pictures to non iPhone clients? iPhone won't send pictures to Android? Try not to miss: How to Transfer Pictures from iPhone to Android
Section 1: Fix iPhone Won't Send Photo by means of MMS
1. Photograph is sent by means of MMS. So as a matter of first importance, observe whether the MMS capacity is empowered. Go to Settings > Messages and ensure MMS Messaging is turned on.
Empower MMS on iPhone
2. In the event that the MMS is empowered, the second thing you ought to affirm is that whether your transporter permits MMS. Simply ring your bearer to know the appropriate response.
3. In the event that there is nothing to do the bearer, go to check the cell arrange. A frail cell system can fizzle you to send any vast record. In the event that the system is feeble, go to a place where there's great scope and attempt to send the picture once more.
4. Reset Network. Go to Settings > General > Reset Network Settings to reset the Wi-Fi settings and the settings of your bearer association. This will once in a while investigate the issue.
Reset Network Settings
Section 2: Fix Picture Not Being Send by means of iMessage
1. iMessage works when you have it empowered and the beneficiary is additionally utilizing iMessage. This requires the beneficiary is likewise utilizing an iPhone, iPad, iPod touch or a Mac. Along these lines, affirm this first.
2. Check the Wi-Fi/Cellar arrange. Attempt to open a site page in program to check if the system works fine. Alternately you can reset organize by means of Settings > General > Reset Network Settings.
3. Reestablish your iPhone. In the event that you can't send pics by means of messages still, you are encouraged to reset your iPhone to production line settings. Since plant reset will delete all information on your iPhone, please reinforcement your gadget with iTunes or iCloud first.
At that point, associate your iPhone to PC with USB link and open iTunes > Click "Reestablish iPhone ..." catch in the outline board when your iPhone shows up > Click "Reestablish" again to affirm your activity. At that point, iTunes will reestablish your iPhone to processing plant settings. At the point when your iPhone restart, you can reestablish iPhone from iTunes reinforcement or iCloud reinforcement.
Reestablish iPhone to Factory Settings
4. On the off chance that even the industrial facility resetting can't take care of the issue, the issue may created by the iMessage server itself. Since this is out of your control, you simply need to hold up the server to swing back to typical.
Attempt these strategies one by one and reveal to us which technique works for you in the remarks.
Share iTunes Playlist with Friends and Family
Maybe after a rushed procedure of looking and assembling tunes, you've made the world's best playlist for birthday parties, for composing on a blustery day, or for a long trip. You can send these rundowns to your companions so that they, as well, can appreciate these excellent melodies. However, now the question is that how to impart playlists to others?
All things considered, look no further; here is the nitty gritty answer on the most proficient method to impart iTunes playlist to loved ones.
Arrangement 1: Share Playlist with Others through iTunes
Arrangement 2: Share a Playlist As a Gift
Arrangement 3: Share iTunes Playlist with an iOS Manager
Arrangement 1: Share Playlist with Others through iTunes
1. Above all else, check our past guide on the best way to trade iTunes playlist to get the playlist on your PC.
2. Spare the records as default .xml document to impart it to your companions or families by sending the document to he/her.
3. For the beneficiary, he/she just need to open iTunes and go to "File">"library">"Import Playlist"> select the .xml document got.
Note: If your companion doesn't have every one of the tunes on the rundown, he or she will see an alarm appeared in underneath. For this situation, you can swing to Solution 3 to share iTunes playlist.
Import Playlist Error
Arrangement 2: Share Playlist As a Gift
iTunes blessing cards make incredible stocking stuffers, yet did you realize that you can likewise give one of your iTunes tunes as a blessing? Here's the manner by which it works:
Note:
Just tunes accessible in the iTunes Store can be skilled. In the event that your playlist contains tunes that you tore from CD or downloaded from another Internet music store, you won't not have the capacity to give them as a blessing in iTunes.
Gifting a playlist is accessible on iTunes 10 or prior. You can blessing melodies independently or blessing an entire collection on iTunes 12 and iTunes 11.
1. Open iTunes and overhaul the iTunes to the most recent form on your PC or Mac.
2. sign in with your Apple ID and secret word.
3. Go to iTunes Store and discover the things ( books, book recordings, music, films, TV appears, or applications).
iTunes Store
4. To one side of the thing's value, tap the bolt. From the menu, pick Gift This (thing sort). Here is "Blessing This Album."
Blessing An Album
5. Fill your installment data.
Fill Payment Information
6. Enter your beneficiary's email address and include a message on the off chance that you need.
7. Pick the day you need to send the blessing and snap next.
8.Confirm your blessing buy and snap Buy Gift.
Affirm Gift Playlist
Arrangement 3: Share iTunes Playlist with an iOS Manager
In the event that you would prefer not to pay to share a playlist as a blessing or you need to impart playlist along to genuine music documents to your companions, you can utilize FonePaw iOS Transfer.
Reset Forgotten Restrictions Passcode on iPhone & iPad
The Restrictions settings, otherwise called parental controls, are routinely used to piece or limit particular applications and components on your iPhone, iPad, or iPod touch, including YouTube and substance from your Music, Podcasts, and iBooks, and so forth. This is a decent component for you to limit your youngsters play recreations or open different applications on your iPhone/iPad.
Of course, Restrictions is crippled. In any case, in the event that you need to square applications or substance on your iPhone, you can include that confinement by setting a password in Settings > General > Restrictions. The Restrictions password is a 4-digit number that you have to enter each time you need to get to or utilize the confined applications or substance. Sadly, at times individuals overlooked the Restrictions password they have set with the goal that they can't get to certain applications. On the off chance that you are additionally the one, here we demonstrate to you proper methodologies to reset overlooked limitations password on your iPhone 6s/6/5s/4s and iPad.
Reset Restrictions Passcode on iPhone
Reset/Change iPhone Restrictions Passcode
The best way to reset, change or expel the Restrictions password is to delete your gadget and set it up as new. By processing plant reestablishing your iPhone, you will lose all information on the gadget. Ideally you've reinforcement your valuable iPhone photographs, contacts, music, and so forth beforehand. Take after the means underneath to expel Restrictions password on iPhone.
Step 1. Open iTunes on Mac or PC. At that point, interface your iPhone to the PC with a USB link.
Step 2. In the event that a message on your iPhone requests that you "Believe This Computer",tap "Trust".
Step 3. Click your iPhone symbol when it shows up in iTunes.
Step 4. In the Summary board, click "Reestablish iPhone".
Reestablish iPhone
Step 5. After your gadget reestablishes to production line settings, it restarts. The Restrictions is evacuated. Presently you can set it up as new and reset Restrictions password on your iPhone.
Imperative NOTE: When you see an appreciated screen on your iPhone, select "Set Up as New iPhone" when advanced. In the event that you reestablish "from iTunes Backup" or "Reestablish from iCloud Backup", you will just reestablish your confinements secret word also.
Reestablish iPhone as New
FAQs
Q: If I can't reestablish iPhone from reinforcement, does it imply that I will lose all information on my iPhone and begin from stratch?
No. despite everything you have two alternatives to get back your iPhone information.
Alternative 1: Restore your iPhone from a reinforcement made before the limitations password was set.
Alternative 2: You can recuperate iPhone information with FonePaw iPhone Data Recovery. In the event that you've moved down your iPhone with iTunes or iCloud, you can extricate iPhone documents from iTunes or reestablish iPhone from iCloud with this program. Every single recuperated document will be saved money on your PC. On the off chance that vital, you can adjust them back to your iPhone and FonePaw iOS Transfer can help you duplicate photographs, music, contacts, voice notices, ringtones, motion pictures, recordings, and so forth from PC to iPhone, iPad and iPod.
Q. How might I go down iPhone without iTunes or iCloud so next time when I processing plant reset my gadget I can get back documents simpler?
You are encouraged to go down your iOS gadget with iTunes or iCloud routinely. What's more, you have other better decision which permits you reinforcement iPhone without iTunes. FonePaw iOS Transfer permits you to reinforcement all or particular records on your iPhone, iPad or iPod. You can reinforcement iPhone to Mac or PC. You can likewise reinforcement iPhone photographs, contacts, music, SMS or different documents that you require particularly. Dissimilar to iTunes or iCloud which is a sort of "nothing-or-all" reinforcement strategy, FonePaw iOS Transfer gives you the shot for determination.
Monday, February 13, 2017
iPhone Won't Play Videos? Fix Videos Not Playing on iPhone 6s/6/5s
iPhone these days bids an awesome greater part of film beaus with their wide screen, high determination and compact size. By and large, a great many people can appreciate cherished recordings in iPhone. Notwithstanding, issues occur with each cell phone. Some unfortunate iPhone 6s/6/5s clients cause harm when playing recordings.
"I've had my iPhone 6 or more since the start of the week and each time I've attempted to play a video it simply has the going round in circles symbol and nothing plays. This is the same in Safari, Facebook and YouTube - any fixes out there?"
It can bother to be bombed in playing most loved recordings in compact iPhone 6s/6/5s. Fortunately, there are courses accessible for you to settle it yourselves.
1. Change over Videos into Compatible Format with iPhone
The normal reason the recordings not playing no iPhone is that video you will watch is not upheld by iPhone. So here you ought to learn recordings arrange for iPhone.
H.264, up to 1.5Mbps, 640 by 480 pixels, 30 outlines for every second, Low-Complexity adaptation of the Baseline Profile with AAC-LC sound up to 160 Kbps, 48kHz, stereo sound in .m4v, .mp4, and .mov document designs.
H.264 video, up to 768kbps, 320 by 240 pixels, and 30 outlines for each second, Baseline Profile up to Level 1.3 with AAC-LC sound up to 160 Kbps, 48 kHz, and stereo sound in .m4v, .mp4, and .mov document groups.
MPEG-4 video up to 2.5 Mbps, 640 by 480 pixels, 30 outlines for each second, Simple Profile with AAC-LC sound up to 160 Kbps, 48 kHz, and stereo sound in .m4v, .mp4, and .mov document designs.
2. Erase Particular Invalid or Damaged Video
There stands a shot that you can't play video on the grounds that the video document you attempt to open has been harmed. Its side effect shows up as your iPhone hangs or stop reliably amidst a specific video. Simply erase the invalid or defiled video record and check if your iPhone 6s/6/5s can playback different motion pictures typically.
3. Restart or Reset iPhone 6s/6/5s
Odds are you are not ready to play recordings on iPhone or iPhone application when your iPhone or applications get solidified and doesn't react to any of your request. The primary exertion you take ought to restart your iPhone: Press and hold the Sleep/Wake catch until a red slider shows up. Slide your finger over the slider to kill iPhone. To restart iPhone, simply press and hold the Sleep/Wake catch until the Apple logo shows up. Given iPhone still inert in the wake of restarting, you need to reset it: press and hold the Sleep/Wake catch and the Home catch in the meantime until the Apple logo shows up. It might cost no less than ten minutes.
4. Drive Quit the Video Apps on an iPhone
On the off chance that you neglect to play recordings on applications because of some rowdiness, press and hold the Sleep/Wake catch for a few moments until a red slider shows up, then press and hold the Home catch until the application stops. Alternately double tap to show running applications and swipe up to leave certain application.
5. Erase Faulty Apps
The motivation behind why the video playback is not working might be some flawed application you have introduced as of late. Make a point to erase conceivable defective applications. Explore the application area on the Home screen and after that tap on the symbol and hold until a X appears. Tap on it to erase the application.
Erase Apps on iPhone
6. Reestablish Your iPhone 6s/6/5s
In the event that nothing unless there are other options takes care of the issue, the last choice for you ought to be reestablish the iPhone to its unique plant settings. Reestablishing an iPhone will erase the majority of your iPhone 6s/6/5s information. Ensure that you have moved down your whole iPhone or iTunes before reestablishing it.
1). Associate iPhone to your PC with iTunes introduced.
2). In iTunes screen, click your iPhone name, then Summary at the highest point of the screen.
3). Click Restore iPhone and affirm it when incited.
4). After your gadget is reestablished to manufacturing plant settings, it will restart and you will see the Slide to set up welcome screen. Take after the means in the setup aide. You can set up your gadget as new or utilize a past reinforcement.
Reestablish iPhone by means of iTunes
I am certain that you will discover an answer workable for you. Don't hesitate to leave us a remark after you give them a shot.
How to Share Music on iPhone
As a music beau who "investigates" awesome tunes each day, I meet some extraordinary tunes every now and then as well. For this magnificent music, I hear them out over and over, as well as I will impart them to family and companions that I think may appreciate them the same amount of as I do. In this post I will demonstrate you three most piratical approaches to share music on iPhone.
Section 1: How to Share Apple Music Songs on iPhone with AirDrop
Section 2: How to Share Music on iPhone with FonePaw iOS Transfer
Section 3: How to Share Music on iPhone with Family Sharing
Section 1: How to Share Apple Music Songs on iPhone with AirDrop
One of the cool things you can do with a spilling administration like Apple Music is making playlists and sharing music. Presently, know in profound how to share Apple Music melody to your companion utilizing Airdrop.
1. Turned on AirDrop from Control Center by swiping up from the base bezel of your iPhone.
Turn on Airdrop on iPhone
2. Keep Bluetooth and Wi-Fi on in the event that you need to utilize Airdrop to share music from iPhone to iPhone or from iPhone to Mac.
3. Dispatch Music App which is running on iOS 8.4 and the later gadget. At that point, tap on New tab and afterward explore to your main tune.
4. Presently go for More (… ) symbol alternative at right-base side of the iPhone screen and tap on it. You'll get five choices. Simply select Share Song… among them.
Select Sahred Songs
5. You'll see like given underneath screen there are a few upheld sharing symbols (Airdrop, Message, Facebook, Mail, Twitter, Copy Link and that's just the beginning). Tap on Airdrop.
Tap on Airdrop to Share Music
There are clearly specific necessities which you have to know to impart iPhone Apple Music to Airdrop effectively.
To impart music to Airdrop, both of the Apple gadgets ought to utilize Apple Music which must be utilized on iOS 8.4 and the later.
Constrained to late iOS gadgets.
Section 2: How to Share Music on iPhone with FonePaw iOS Transfer
Both two of the techniques specified above may can't fulfill you since Family Sharing just permits you to share buys while Airdrop requires Apple Music subscribed. That is the reason I like FonePaw iOS Transfer most.
FonePaw iOS Transfer permits iPhone, iPad and iPod clients share music between iOS gadgets without confinements. Despite the music is bought from iTunes Store, downloaded from web or tore from CD, you can exchange them starting with one iPhone then onto the next effectively. Likewise, there is no Apple Music membership and Wi-Fi necessities. As aches as your iOS gadget is running from iOS 6 to iOS 9, you can utilize it.
1. Download and introduce FonePaw iOS Transfer on your PC (Windows or Mac).
Windows Version DownloadMac Version Download
2. Associate your iPhone and the iOS gadget you need to impart music to the PC.
Associate iPhone and Another iOS Device
3. At the point when both the gadget is identified, click "Media" tab under your iPhone name. At that point, click "Music" on the top toolbar. Tick those music you need and snap "Fare to" > "Fare to (another gadget's name)".
Send out Music from Device to Device
Basic and simple to utilize, FonePaw iOS Transfer works incredible for those of us that adoration discoveries and imparting music to iPhone, iPad or iPod. It is no distortion to state that this program makes the entire experience of gushing music between iPhone a charming one.
Windows Version DownloadMac Version Download
In the event that you are utilizing an Android telephone, you can check these articles to share music:
• How to Transfer Music from iPhone to Android
• How to Transfer Video and Music from Android to iPhone
• How to Transfer Music from Android to Android
Section 3: How to Share Music on iPhone with Family Sharing
A standout amongst the most fascinating and astounding components in iOS 8 is "Family Sharing". With Family Sharing, relatives and conceding individuals get quick access to each other's music, motion pictures, books, applications, and so on that bought from iTunes Store.
1. Go to Settings > iCloud > Set up Family Sharing... > Get Started > Continue on iPhone to empower Family Sharing. At that point, a credit or charge card is required.
Set up Family Sharing
2. As the Organizer of the Family Share plan, you're in charge of setting up an installment alternative for future iTunes and App Store buys. That implies you're in charge of paying for other individuals' buys.
3. To add relatives to your gathering, tap "Include Family Member...". You'll have the capacity to welcome individuals through email address (up to 5 add up to), which they should affirm.
4. Once you've set up Family Sharing, everybody can get to every others' applications, music, motion pictures, TV shows and books. Explore to iTunes Store > More > Purchased. Select a relative and download the music you need from them.
By utilizing Family Sharing, you should realize that:
• You can just share bought music on iPhone, which implies the music you tore from CD, downloaded from web, got from others are all can't be shared.
• Family Sharing is inaccessible on the iPad, iPhone 4/3GS, iPad touch 4 and more established models.
• The Organizer is in charge of all new buys, which yes, is somewhat torment.
Section 1: How to Share Apple Music Songs on iPhone with AirDrop
Section 2: How to Share Music on iPhone with FonePaw iOS Transfer
Section 3: How to Share Music on iPhone with Family Sharing
Section 1: How to Share Apple Music Songs on iPhone with AirDrop
One of the cool things you can do with a spilling administration like Apple Music is making playlists and sharing music. Presently, know in profound how to share Apple Music melody to your companion utilizing Airdrop.
1. Turned on AirDrop from Control Center by swiping up from the base bezel of your iPhone.
Turn on Airdrop on iPhone
2. Keep Bluetooth and Wi-Fi on in the event that you need to utilize Airdrop to share music from iPhone to iPhone or from iPhone to Mac.
3. Dispatch Music App which is running on iOS 8.4 and the later gadget. At that point, tap on New tab and afterward explore to your main tune.
4. Presently go for More (… ) symbol alternative at right-base side of the iPhone screen and tap on it. You'll get five choices. Simply select Share Song… among them.
Select Sahred Songs
5. You'll see like given underneath screen there are a few upheld sharing symbols (Airdrop, Message, Facebook, Mail, Twitter, Copy Link and that's just the beginning). Tap on Airdrop.
Tap on Airdrop to Share Music
There are clearly specific necessities which you have to know to impart iPhone Apple Music to Airdrop effectively.
To impart music to Airdrop, both of the Apple gadgets ought to utilize Apple Music which must be utilized on iOS 8.4 and the later.
Constrained to late iOS gadgets.
Section 2: How to Share Music on iPhone with FonePaw iOS Transfer
Both two of the techniques specified above may can't fulfill you since Family Sharing just permits you to share buys while Airdrop requires Apple Music subscribed. That is the reason I like FonePaw iOS Transfer most.
FonePaw iOS Transfer permits iPhone, iPad and iPod clients share music between iOS gadgets without confinements. Despite the music is bought from iTunes Store, downloaded from web or tore from CD, you can exchange them starting with one iPhone then onto the next effectively. Likewise, there is no Apple Music membership and Wi-Fi necessities. As aches as your iOS gadget is running from iOS 6 to iOS 9, you can utilize it.
1. Download and introduce FonePaw iOS Transfer on your PC (Windows or Mac).
Windows Version DownloadMac Version Download
2. Associate your iPhone and the iOS gadget you need to impart music to the PC.
Associate iPhone and Another iOS Device
3. At the point when both the gadget is identified, click "Media" tab under your iPhone name. At that point, click "Music" on the top toolbar. Tick those music you need and snap "Fare to" > "Fare to (another gadget's name)".
Send out Music from Device to Device
Basic and simple to utilize, FonePaw iOS Transfer works incredible for those of us that adoration discoveries and imparting music to iPhone, iPad or iPod. It is no distortion to state that this program makes the entire experience of gushing music between iPhone a charming one.
Windows Version DownloadMac Version Download
In the event that you are utilizing an Android telephone, you can check these articles to share music:
• How to Transfer Music from iPhone to Android
• How to Transfer Video and Music from Android to iPhone
• How to Transfer Music from Android to Android
Section 3: How to Share Music on iPhone with Family Sharing
A standout amongst the most fascinating and astounding components in iOS 8 is "Family Sharing". With Family Sharing, relatives and conceding individuals get quick access to each other's music, motion pictures, books, applications, and so on that bought from iTunes Store.
1. Go to Settings > iCloud > Set up Family Sharing... > Get Started > Continue on iPhone to empower Family Sharing. At that point, a credit or charge card is required.
Set up Family Sharing
2. As the Organizer of the Family Share plan, you're in charge of setting up an installment alternative for future iTunes and App Store buys. That implies you're in charge of paying for other individuals' buys.
3. To add relatives to your gathering, tap "Include Family Member...". You'll have the capacity to welcome individuals through email address (up to 5 add up to), which they should affirm.
4. Once you've set up Family Sharing, everybody can get to every others' applications, music, motion pictures, TV shows and books. Explore to iTunes Store > More > Purchased. Select a relative and download the music you need from them.
By utilizing Family Sharing, you should realize that:
• You can just share bought music on iPhone, which implies the music you tore from CD, downloaded from web, got from others are all can't be shared.
• Family Sharing is inaccessible on the iPad, iPhone 4/3GS, iPad touch 4 and more established models.
• The Organizer is in charge of all new buys, which yes, is somewhat torment.
Forgot iCloud Password: How to Change/Reset iCloud Password on iPhone/iPad
Overlooked secret word is a typical issue and I'm certain that we've all once tapped the acclaimed 'Overlooked Password' connect eventually in our lives. This time, you overlooked iCloud secret word and you don't know where to discover the "Overlooked Password" interface obviously.
What is iCloud Password?
The iCloud secret key is utilized to sign into iCloud on your Mac, iPhone, iPad or iPod. Your iCloud watchword ensures the security of the data, for example, your family or individual photographs, contacts, notes, archives and that's just the beginning. In the event that you overlooked iCloud secret key, you can't get to these documents. Additionally, your secret key ensures your capacity to find or remotely delete your gadget utilizing Find My iPhone.
As a rule, the Apple ID and secret key utilized on iCloud will be a similar that you use to make buy from App Store. So in the event that you can recollect your App Store secret key, give it a shot to login into iCloud. On the off chance that it comes up short, read on and figure out how to reset iCloud secret key.
Note: Generally, your Apple ID is the ID for your iCloud account. For this situation, resetting iCloud secret key means resetting Apple ID watchword.
Ventures to Take on the off chance that you Forgot iCloud Password
We have three approaches to reset iCloud secret key:
• Email validation
• Answer security questions
• Two-stage confirmation
Regardless of which technique you will pick, you ought to take after the means beneath first.
Step 1. Go to My Apple ID (appleid.apple.com) and select "Overlooked Apple ID or secret word?"
Overlooked iCloud Passcode
Step 2. Enter your Apple ID and snap "Proceed". At that point, select one of the approaches to reset iCloud secret word.
Enter Apple ID
Strategy 1: Recover iCloud Password with Email Authentication
1. When you ventured into "Reset Password" page, you can pick the "Get an email" alternative. At that point, Apple will send guidelines to your email address which is utilized as Apple ID.
Reset iCloud Password by means of Email
2. Take after the heading on the email to reset or change iCloud secret key.
Technique 2: Reset iCloud Password by Answering Security Questions
1. You can likewise reset iCloud secret key utilizing security address.
Answer Security Question to Reset iCloud Password
2. Enter the date of your introduction to the world > Continue > Answer the security address > pick another secret key > Reset watchword.
Strategy 3: Recover iCloud Password with two-stage Verification
In the event that you set up two-stage confirmation, you can utilize it to change or reset your secret key. You simply require a recuperation key and a put stock in gadget. Take after these means:
1. Enter your Recovery Key.
Two-stage Verification
2. Pick a put stock in gadget. Apple will send your gadget a confirmation code.
3. Enter the confirmation code and after that set another secret word and select Reset Password.
By taking after the strategies we have imparted to you, you'll have the capacity to reset iCloud password in no time flat. In the event that you experience any issue amid the procedure, please leave your remarks beneath.
Sunday, February 12, 2017
Fix iPhone Stuck In Boot Loop
You turn on your iPhone, attempting to call a companion when the gadget stalls out in a boot circle. Restarting the gadget doesn't work and you can't make sense of how to settle it. You attempt to switch on the gadget again however when the gadget opens, it begins to boot once more.
This issue is normal and can happen to any iPhone whenever for an assortment of reasons. In this article, we will address this issue, demonstrating to you a couple approaches to settle it.
iPhone Gets Stuck In The Boot Loop
Why Does The iPhone Get Stuck In The Boot Loop?
There are a great deal of motivation behind why your gadget can be stuck on a boot circle. The accompanying are recently the absolute most normal reasons.
Breaking down Battery Connector
The battery connector can glitch which could imply that your gadget is not getting enough power, bringing about the boot circle.
Programming Update
Moving up to the new OS can precipitate this also. Your iPhone can stall out amidst the overhaul, and cause these peculiarities.
Imprison breaking the OS.
Jailbreaking can bring about major issues. If not done consummately, your iPhone can separate and will most likely be unable to perform even the least difficult of undertakings. Besides, did we disclose to you it's illicit?
3 Possible Solutions To Fix iPhone Stuck in Boot Loop
1
Check the Battery Connector
Start by checking the battery connector. On the off chance that it is failing, the issue could be effortlessly settled by settling the battery connector. When it's settled, the gadget ought to have the capacity to get satisfactory power. You can then simply reboot the framework and it ought to have returned to typical.
Check the Battery Connector
2
Placed iPhone into Recovery Mode
By and large, you can settle these issues by putting your iPhone into recuperation mode. To do that, take after these means:
Step 1. Associate your iPhone to your PC and open iTunes.
Step 2. Continue squeezing and holding the Sleep/Wake and Home key for no less than ten seconds, and don't discharge when you see the Apple logo. Continue holding until the iTunes logo shows up on the screen.
Step 3. You'll know the telephone is presently in recuperation mode on the grounds that a window in iTunes will let you know.
Step 4. You will see a message requesting that you Restore or Update, pick Update firstly. iTunes will attempt to reinstall iOS without wiping your information. Sit tight for the redesign advance. On the off chance that the advance takes over 15 minutes and your iPhone exits recuperation mode, rehash the upper strides and pick reestablish. This will delete the substance and settings on your gadget.
Placing iPhone into Recovery Mode
More subtle elements: How to put your iOS gadget in recuperation mode.
On the off chance that Recovery mode doesn't settle the issue, an outsider program might have the capacity to offer assistance. One of the best is iMyFone D-Back that as of late added a component to help clients settle iOS framework issues, for example, an iPhone stuck on the white scree, dark screen, the boot circle and the sky is the limit from there.
3
Settle iPhone Stuck in a Boot Loop by means of outsider Tool without Data Loss
iMyFone D-Back iPhone information recuperation Win or iPhone information recuperation Mac is an expert iPhone information recuperation apparatus, which helps you settle your iPhone framework to typical and recoup the lost documented from iPhone, iTunes reinforcement or iCloud reinforcement. Here is a glance at a portion of alternate elements you might want.
Settle your iOS System from different issues, for example, iPhone white screen of death, iPhone stuck in recuperation mode, iPhone won't turn on without Data Loss.
Backings to recuperate 22+ distinct sorts of documents on all iOS gadgets.
See work which gives you a chance to see the documents you would need to keep and the ones you need expel until the end of time.
Support to recuperate information straightforwardly from gadget or concentrate information from iTunes/iCloud reinforcement specifically.
download-win download-macintosh
Ventures to Fix an iPhone Stuck in a Boot Loop
Step 1: Download, introduce iMyFone D-Back on your PC. Run iMyFone D-Back on your PC after establishment. Tap on 'Settle iOS framework' alternative.
Pick settle ios framework
Step 2: Connect your gadget to your PC and sit tight for iMyFone to remember it.
Interface your gadget to your PC
Step 3: the program will start repairing the gadget instantly. Once the procedure is finished, the gadget will restart in ordinary mode.
download most recent firmware
Step 4: Start the repair procedure, which just takes a couple of minutes. Presently, your iPhone will have returned to the ordinary mode, and will work similarly as you needed it to.
Begin the repair procedure
iMyFone D-Back iPhone information recuperation Win or iPhone information recuperation Mac makes it simple to settle any iOS framework issue. It is snappy and simple and the greater part of all, you won't lose any information on the gadget.
How Much Space Does iOS 10 take Up?
Each report on iOS merits downloading and introducing due to the affirmation that there is something new and fascinating. Similarly as iOS 9.3 accompanied such a variety of awe-inspiring elements, so is iOS 10. In any case, before moving up to iOS 10, we ought to make one thing clear: what amount of space does iOS 10 take up?
In case you're an impassioned iPhone client who utilizes their gadget intensely for exercises, for example, to tune in to podcast, play substantial diversions, take photographs frequently, then you may have encounted the quite feared "Not Enough Storage" provoke. This article will demonstrate you peaceful approaches to free up tremendous space on your iOS 10 gadget.
Section 1: How Much Storage Do I Need for iOS 10?
Section 2: Free Way to Get Enough Space Required for iOS 10!
Section 3: 3 Little Tricks to Optimize iOS 10 Storage Space
Section 1: How Much Storage Do I Need for iOS 10?
It is not sure how much storage room one need to have in his iOS gadget before introducing iOS 10. Notwithstanding, the upgrade indicates 1.7GB size and would require around 1.5GB of fleeting space keeping in mind the end goal to totally introduce the iOS.
Henceforth, you are relied upon to have no less than 4GB of storage room before updating. You can take after some advantageous advisers for make higher memory space on your iPhone, keeping in mind the end goal to have enough storage room for this redesign.
ios 10
Section 2: Free Way to Get Enough Space Required for iOS 10!
In case you're an enthusiastic iPhone client who utilizes their gadget vigorously for exercises, for example, to tune in to podcast, play substantial diversions, take photographs frequently, then you may have encounted the greatly feared "Not Enough Storage" provoke. Presently, to get enough stockpiling for moving up to iOS 10, we should check what should be possible to free up your iDevice. Firstly, we ought to comprehend what can be improved on your iPhone.
1
Documents and Data Which Should be Cleaned up from iPhone
Garbage Files: App Caches/Cookies, Crash Logs, Corrupted documents: These repetitive records aggregate at an exceptionally fast pace, and will harm the execution of your gadget and decrease the viability. Excessively numerous such records can even prompt to iPhone stuck and App crash, so we ought to firstly erase these documents.
Erased Files: The erased documents still exist on your iPhone despite the fact that they are undetectable. These futile documents likewise gobble up your capacity. Also, on the off chance that you have erased some touchy records, such documents can be recuperated effortlessly by information recuperation programming, that may prompt to protection spill.
Many Photos: Pictures can accident to end up distinctly exceptionally colossal and too enormous. If not very much oversaw, you will begin having low storage room issues and moderate iOS execution.
Known and Unknown Videos:iPhone 4K recordings have a huge size, even a short video of 1 moment can involve 300MB stockpiling. In the event that you have several recordings, they could eat up tremendous space.
2
The most effective method to Get Enough iOS 10 Required Space
1. Free Way to Clear up Junk and Temporary Files, App Caches, Corrupted documents
All in all, garbage documents or application stores are covered up and undetectable, so to evacuate all them, we require the assistance of iMyFone Umate Pro or iMyFone Umate Pro for Mac – a capable iOS reserve cleaner who is uncommon at erasing such records for iPhone/iPad/iPod Touch. Simply free download the trial rendition, it gives the FREE capacity of evacuating iOS garbage documents, including all App stores and tainted records.
To utilize it, you simply need to interface your gadget, then output your gadget and tap on "Clean" finally.
Windows adaptation Mac rendition
free up capacity for
2. Discover All Delete Files
I say "for all time eradicate" on the grounds that erased documents can in any case be recuperated by recuperation programming. Be that as it may, in the event that you delete information with Umate Pro, then the eradicated information is 100% unrecoverable, even the most current recuperation programming can't recuperation them. You can attempt the "Eradicate Deleted Files" capacity of Umate Pro, it will check you iPhone and discover your erased records for nothing.
oversee iphone private records
This choice is particularly reasonable for the individuals who frequently impart their iPhone to companions/relatives, or plan to send your iPhone to repair. With respect to some touchy information, similar to financial balance and passwords, private talk history/messages, individual photographs/recordings and so on, we may not need any other person access them. So the most ideal route is to forever eradicate all them before giving your iPhone to others.
3. Reinforcement photographs/Videos to iCloud
To manage the substantial size photographs and recordings, you can go down the first documents to iCloud, then erase all them from your iPhone and you'll get enormous capacity back.
In any case, for the imperceptible photographs and recordings, you ought to at present swing to iMyFone Umate Pro, it can recognize and list every single extensive document more than 5MB on your iOS Device, you can see and choose to erase them or disregard them.
oversee iphone recordings
Umate likewise gives the choice of packing photographs, you can pack photographs to recover 75% of your photograph space, and you'll have an auto move down for your unique photographs on your PC.
Section 3: 3 Little Tricks to Optimize iOS 10 Storage Space
In case regardless you're battling for space on your iOS 10 gadgets, then this part of the article is for you. These are three basic deceives you can take after to recoup more storage room:
1. Delete and Reinstall Yyour Social Media Apps
Web-based social networking applications, for example, Facebook, Twitter, Whatsapp, Snapchat and the preferences are one of the greatest offenders with regards to storage room stopping up. They use a ton of reserving to give the client encounter. Erasing them will clear every one of the records related with the application.
2. Turn of programmed download on Whatsapp
Kill programmed downloads from your Whatsapp by heading off to the settings in the Whatsapp application > "Information and Storage Usage" > kill auto-download for video, music, and photographs. You'll be astounded how much space you'll be sparing with this little demonstration.
3. Delete Old messages
You'll be shocked the measure of dross stuck in your message application particularly from old messages you most likely will never require again. To erase old messages from your gadget without erasing them in a steady progression by doing this: Settings > Messages > Message History > Keep Messages > select 30 days. Tap "Erase" on the provoke to erase all messags and document connection more seasoned than 30 days.
How to Delete Downloads on iPhone
clean downloads
Section 1: How to Delete Downloads from iPhone
Section 2: How to Delete Downloads on iPhone with One Click
Instructions to Delete Downloads from iPhone
1
One-by-One Method
erase downlaod podcast
2
Across the board Method
In any case, erasing downloads one by one would be a couple disappointment. There is a much simple path for how to erase downloads on iPhone. Uninstalling and reinstalling outsider applications would be a quick approach to do as such. Through uninstalltion, all information and documents in the applications would be expelled and the downloads are comprehensive.
Go to Settings > General > Storage and iCloud Usage > Manage Storage.
Click an application and pick Delete App. Rehash the activity on different applications.
Go to App Store to reinstall applications effortlessly.
settingsgeneralusage
Be that as it may, some essential information or documents will be evacuated too.
The most effective method to Delete Downloads on iPhone with One Click
Strategy 1 above would just evacuate the downloads, yet activities well ordered, one by one would be disappointed for most iPhone clients since all downloads are in various areas. Technique 2 will erroneously erase some imperative documents. You may ponder there is a superior approach to erase downloads or not. Fortunately, iMyFone iPhone Cleaner or iMyFone iPhone Cleaner for Mac has the alternative for it.
iMyFone iPhone Cleaner is one of the best iPhone cleaners, which wins bunches of clients' ideal audits. Erasing downloads is one of the critical capacities on it, including erasing downloaded photographs, recordings, media and motion pictures. Maintaining a strategic distance from impediments of the techniques above, it offers you much simple and basic path for how to erase downloads from iPhone. Filling in as across the board answer for space sparing and private insurance, it surely has other astounding components.
Windows variant Mac adaptation
1
Instructions to Delete Downloaded Photos with 1 click
Step 1: Install iMyFone iPhone Cleaner on your PC. Dispatch the product and associate your iPhone to it.
associate iDevice to pc
Step 2: Go to 1-Click Free Up Space tab. Click Quick Scan catch on the home screen. When examining completes, you will know how much space can be cleaned on your iPhone.
Snappy Scan
Step 3: Go to Clean catch of Photos and select Backup and Delete. At that point select the downloaded photographs and hit begin catch. At that point the downloaded photographs will be expelled from your iPhone.
erase photographs
2
The most effective method to Delete Downloaded Videos, Media and Movies
Ventures to erase downloaded recordings are like how to erase downloads of photographs on iPhone.
Step 1 and Step 2 are the same as last part.
Step 3: Go to Clean catch of Large Files. It will examine your iPhone and discover every one of the recordings, media and films more than 5MB. At that point hit Backup and Delete catch to begin the procedure.
Friday, February 10, 2017
Delete Games From My iPad
Erasing Apps on your iPad can be tedious errand on the off chance that you need to erase a cluster Games and Apps. You are erasing those Apps in light of the fact that may you are drained playing of your Games on your iPad or you simply need to make more space for your new App that you need to introduce. It's entirely irritating to erase all the applications and amusements you need to erase as you should erase of them one by one.
Instructions to Delete Games on iPad Directly
Erasing Apps on iPad is somewhat exhausting assignment. Give me a chance to demonstrate to erase Games and Apps on your iPad or iPhone. Taking after are the means that you require to erase Games and Apps shape your iPad.
Scan for the Game or App you need to erase. Than hold your finger on the symbol until a little cross symbol shows up.
Tap on the little cross indication of the Game or App you need to erase.
Presently a pop discourse box will show up demonstrating to you a message that erasing App will erase every one of its information. Tap erase to erase that App or Game. Then again wipe out the operation to backpedal.
erase ipad recreations
Note: You should likewise erase Games and Apps from iTunes too with a specific end goal to stop Apps Syncing back to your iPad.
Step by step instructions to Delete Games from iPad by means of Settings:
You can likewise erase Apps and Games from settings too. The following are the means to erase Apps and Games from setting:
Go to Setting - > General - > Usage choice.
Than tap demonstrate all Apps to see all the applications introduced on your iPad or iPhone.
Presently tap any of the App you need to erase. Another screen will show up with the "Erase App" alternative.
It will request a notice the erasing this will likewise erase information for this App. Tap "Erase App" choice to erase it totally. On the other hand cross out the operation.
How Do I Mass Delete Games from My iPad
There are numerous virtual products accessible that can erase applications from your iPad or iPhone. The following are the 3 best Software Tools that can be utilized to expel Games and Apps from your iPhone and iPad proficiently.
iMyFone Umate Pro or iMyFone Umate Pro for Mac is a Tool that can be utilized for any iOS gadget, it can erase applications or recreations from your iPad or iPhone on only few ticks. It's accessible for both Windows and MAC, and it likewise have a trial form. Download and introduce to have an attempt now!
Windows adaptation Mac form
The utilizing steps is so natural, you simply need to interface your iPhone or iPad to it. It will give you alternative to choose the Apps and Games from a rundown that you need to erase. You can erase Apps and Games in a mass. It is totally sheltered and simple approach to erasing applications and diversions.
mass erase ipad recreations
Tips: Free Way to Clear up Your iPad Junk Files and Speed up your iPad
You are iPad gets moderate or you don't have space for new photographs or you most loved amusement keeps running with slack. There is an issue with your iPad. It happens in light of the undesirable garbage documents put away on your iPad. These documents are made by various Apps and Games and stay on your memory even you erase those Apps and Games. Keeping in mind the end goal to expel such garbage records, attempt the effective yet free capacity of "garbage document cleanup" with iMyFone Umate Pro.
Keeping in mind the end goal to Use iMyFone Umate, you simply need to perform three straightforward strides:
Step 1: Connect your iPhone or iPad - After you have introduced iMyFone Umate on your PC or Mac. Presently you have to interface you iPhone with the assistance of link. What's more, you gadget will show up on the principle window.
interface ipad
Step 2: Run a Quick Scan - When filtering of your iPad is finished, it will indicate you couple of alternatives to choose before you play out a spotless operation.
check ipad
Step 3: Clean your iPhone - tap the spotless catch other than "Garbage Files" alternative to clean your iPad.
Backup Notes on iPhone 7/SE/6s/6/5s/5c/5/4s/4
"I have huge amounts of imperative data spared in notes of my iPhone. I attempted to reinforcement the notes to PC. Can anybody bail me out?"
As of late, we ran over this question in an Apple gathering however the answers were not acceptable. In this way, we have embraced the assignment to answer it exhaustively. In this article, we will demonstrate you diverse approaches to reinforcement notes on your iPhone.
Section 1. Reinforcement iPhone notes to PC utilizing iPhone information extractor
Section 2. Reinforcement notes on iPhone utilizing iCloud
Section 3. Reinforcement notes on iPhone utilizing iTunes
Section 4. Reinforcement notes on iPhone through Gmail
1
Reinforcement iPhone Notes to Computer Using iPhone Data Extractor
iMyFone D-Back iPhone Data Extractor Win or iPhone Data Extractor Mac is a capable apparatus that can help you separate existing information from your iPhone or your iCloud and iTunes Backup. It permits you to get into the gadget or reinforcement records and specifically separate the notes you require, which you can then spare to your PC.
imyfone d-back iphone information recuperation
Proficient iPhone Data Extractor
It bolsters more than 22 documents sorts like WhatsApp messages, Kik messages, contacts, voice reminders, notes, photographs, recordings and some more.
Backings to recuperate lost/erased information on iPhone and concentrate the current information on your iPhone to PC.
It can remove information from iTunes and iCloud without associating your gadget.
You get a shrewd review of filtered records so you can just reinforcement vital things.
Underpins iPhone 7, iPhone SE, iPhone 6s Plus, iPhone 6 and the most recent iOS 10.new element
download-win download-macintosh
Ventures to reinforcement iPhone notes to PC utilizing iMyFone D-Back
The procedure is very basic and you can do every last bit of it truly effectively.
Step 1: Install the program and open the program. Tap on "Recuperate from iOS Device" which is the second choice on the left side menu. At that point select the green "Begin" catch.
reinforcement notes from iOS Device
Step 2: Now from the document sorts select "Notes" in "Reminder and others" segment and tap on "Next." You will be provoked to associate your iPhone. Utilize the USB link to set up the association. After the program naturally recognizes your iPhone, select the "Sweep" alternative.
Select records
Step 3: After the sweep is finished you will be allowed to see the notes. Along these lines you get to reinforcement just the required notes disposing of the others. You can even review just erased records to spare time. Pick the records you need to reinforcement to PC and tap on "Recuperate" at the lower right part of the window. Select a goal on the Mac or PC to spare the reinforcement and you are finished!
see the notes
Presently you can download the free trial of iMyFone D-Back iPhone Data Extractor Win or iPhone Data Extractor Mac to reinforcement your notes from iPhone 7/6s/6/5s/5c/5/4s/4 on your PC.
Windows form Mac variant
2
Reinforcement Notes on iPhone Using iCloud
iCloud consequently makes reinforcement of iPhone information including your notes. For iCloud, open Settings on iPhone and go to iCloud. Turn on the Notes choice in the event that it is handicapped. At that point explore to Backup to initiate iCloud reinforcement.
Reinforcement notes on iPhone utilizing iCloud
3
Reinforcement Notes on iPhone Using iTunes
It is likewise conceivable to do a similar utilizing iTunes on your PC. To go down notes on your Mac or PC utilizing iTunes, interface your iPhone and open iTunes Summary tab. At that point tap on the checkbox of this PC, then tap on the Back Up Now catch to make a full reinforcement of your iPhone on the PC.
Reinforcement notes on iPhone utilizing itunes
Cons
It requires parcel of investment to make reinforcements
You won't have the capacity to peruse and get to iTunes reinforcement specifically.
4
Reinforcement Notes on iPhone through Gmail
Go to Settings on iPhone and go to Mail. At that point select Add account and pick Gmail. At that point fill in the qualifications to adjust the note to Gmail.
Reinforcement notes on iPhone through Gmail
Cons
The notes are saved money on Gmail and you should sign into get to them.
A web association will likewise be required when you need to get to the Notes.
Thursday, February 9, 2017
Bulk Delete Multiple / Photos from iPhone 7
iPhone 7 photographs have huge size and they can gobble up your iPhone stockpiling rapidly. Be that as it may, expel them one-by-one might exhaust, envision having a huge number of pictures on your gadget; how long will you spend scouring the telephone for the organizer to erase? The best approach is erasing all photographs from iPhone 7 in one run with an onetime snap, obviously that would be in the wake of support them up on your Mac or iCloud account. How about we check the fast strategies to erase photographs from iPhone 7.
Strategy 1: Delete All Photos from iPhone 7 With Mac
Strategy 2: Directly Select and Delete Multiple iPhone 7 Photos
Strategy 3: One-Click to Delete All Photos from iPhone 7 with Backup
1
Erase All Photos from iPhone 7 With Mac
In the event that you are a Mac client, then it will be much less demanding to erase all photographs from iPhone 7. You simply need to take after the underneath steps.
Step 1. Associate your iPhone 7 to your Mac utilizing your USB link and dispatch your Image Capture.
Step 2. In the Image Capture "Gadget Column", you should choose your iPhone or other iDevice that you are taking a shot at.
Step 3. In the wake of selecting your gadget, you should pick the organizer where to go down your photographs in your Mac. You can pick envelopes like Document, Desktop, Image, and so on.
Step 4. When you are finished with picking an organizer, you can tap on "Import All" catch at the base right corner of your window. On the off chance that you have done this, then your photographs will be foreign made to your Mac.
erase iphone 7 photographs
This procedure is successful in maneuvering up and erasing your photographs to recover your iPhone 7 storage room. In any case, if would prefer not to erase photographs from iPhone, iMyFone Umate can help you to losslessly pack your iPhone 7 photographs and recover more than 75% of your iPhone photograph storage room without erasing the photographs.
2
Straightforwardly Select and Delete Multiple iPhone 7 Photos
Step 1. Open Photos application. Go to "Photographs" tab at the base of iPhone screen.
Step 2. You'll see that your photographs are sorted out by Years > Collections > Moments. You ought to tap on "Minutes".
Step 3. In the upper right corner, click "Select".
Step 4. Select all the photographs in a Moment by tapping on "Select" catch of a particular Moment .
Step 5. Subsequent to selecting the same number of Moments as you need, go to the base right of the screen and tap the Trash symbol . All the photographs you've chosen will be erased from your photograph library.
erase iphone photographs
3
A single Click to Delete All Photos from iPhone 7 with Backup
iMyFone Umate Pro or iMyFone Umate Pro for Mac can be utilized to choose all the photographs in your iPhone 7 and erase all them without a moment's delay. A review of the picture will be shown and you can ensure that you are erasing the right photographs. Another alternative is to pack iPhone photographs, pressure can recover around 75% of the photograph space. All the first photographs will be went down on your Mac or Windows PC before pressure and erasure.
What's more, for security insurance, the program likewise offers the capacity of forever eradicating iPhone photographs, the deleted touchy photographs can't be recouped even with the most current recuperation apparatus. What's more, you'll additionally have the choice to eradicate photographs that you have erased in typical routes previously, as these photographs can be effectively recouped if not being completely deleted.
The way toward erasing all photographs from iPhone 7 through iMyFone Umate Pro is exceptionally basic.
Step 1. Download and run the program, then interface your iOS gadget to PC.
Windows adaptation Mac form
Step 2. Select "Photographs" tab from the method of "1-Click Free Up Space". On the off chance that need to for all time eradicate iPhone 7 photographs, you ought to pick the eradicating mode: "Eradicate Deleted Files" and "Eradicate Private Data".
erase iphone photographs
Step 3. At that point the photograph reviews are organized by the date, you can choose undesirable photographs and snap "Reinforcement and Delete" or "Pack and Delete" to erase or pack them.
reinforcement and erase photographs
A standout amongst the most amazing elements that you can see in iMyFone Umate Pro is its capacity to make programmed reinforcements. This reinforcement will be saved money on your PC. Subsequently, you will have the capacity to get to your unique pictures whenever you need. As it were, you won't need to stress over losing important photographs that you have saved money on your iPhone 7.
Tips
We firmly propose you to eradicate your already erased records. Indeed, even the photographs that you have erased long time back may at present exist on your gadget, consuming up storage space and prompting to protection spill on the off chance that they are recuperated by wrong hands.
You can download the free trial variant of Umate Pro and sweep the erased documents for your gadget with the "Eradicate Deleted Files" mode, then review and check if your touchy records still exist on your iPhone.
reinforcement and erase iphone 7 photographs
With iMyFone Umate Pro, your iPhone will be at its ideal execution dependably, iMyFone Umate Pro would likewise push you to:
Clear up garbage and brief documents, such concealed records including photograph reserve, treats, application reserves, crash logs, temp records, client stockpiling records and tainted documents. iMyFone offers "Garbage Files" as free trial.
Mass erase recordings and Apps in a single tick, this can recoup tremendous space without a moment's delay and it's somewhat efficient.
Eradicate private information, such information including individual messages, photographs, recordings, call histories, notes and so forth.
Eradicate erased records - before offering iPhone or sending it to repair, we would do well to delete touchy documents to keep away from protection spill.
Eradicate all information, across the board answer for all time clean everything from your iDevice and a wide range of iOS documents and secret word are upheld here.
Eradicate WhatsApp information, such information including current information and beforehand erased information, both WhatsApp messages and connections can be deleted totally.
Download iCloud Backup to PC
Do you have to make a duplicate of the information in your iCloud account? This can be a decent approach to protect the information if there should be an occurrence of information misfortune. Making a duplicate of the information on your iCloud record should be possible in a couple ways and this article will demonstrate to you industry standards to do it by means of iCloud.com or utilizing an outsider instrument that we will impart to you quickly.
Strategy 1: Download iCloud Data to PC from iCloud.com
Strategy 2: Download iCloud Backup to PC utilizing iCloud Control Panel
Strategy 3: Download 22+ File Types from iCloud reinforcement to PC utilizing outsider Tool
1
Download iCloud Data to PC from iCloud.com
To have the capacity to duplicate information from iCloud.com, you'll need moved up to iCloud Drive. Take after these straightforward strides to do it.
Step 1: On your Mac or PC, start by marking into iCloud.com.
Step 2: You can get to a few information from this site, for example, notes, contacts and timetables.
Step 3: Click on the information you need to duplicate to download it.
Download iCloud Backup to PC utilizing iCloud .com
2
Download iCloud Backup to PC utilizing iCloud Control Panel
Other than utilizing iCloud.com to download your records from iCloud, you can likewise utilize iCloud Control Panel to get to iCloud information:
Step 1: Download the device from Apple official site. Sign in iCloud control board utilizing your apple id and password after establishment.
Step 2: Choose the information or components you need to stay up with the latest over your iOS gadgets.
Download iCloud Backup to PC utilizing iCloud Control Panel
Step 3: To get to information, for example, photographs and recordings utilizing iCloud Control Panel, please tap Settings > iCloud > Photos in iOS 8 or later gadget, then pick Download and Keep Originals and import the photographs to your PC.
Step 4: The transferred photographs will be spared in This PC > iCloud Photos envelope on your windows PC.
iCloud Control Panel
Note: If you empowered iCloud Photo Library on your iOS gadget, your photographs in the All Photos envelope rather than My Photo Stream and recordings will be transferred to iCloud at full determination consequently. Know more insights about iCloud control board.
Professionals
It is anything but difficult to download information from iCloud.
Going after your own information is simple, sheltered and powerful.
It can transfer information like photographs, notes and contacts from your PC.
Cons
It requires that you update your record to have the capacity to utilize iCloud drive to check your documents.
You can just get to iwork records and not PDF and different archives.
Archives made by outsider applications can't be duplicated.
It doesn't bolster access to some document sorts like call history, SMS, iMessage, photograph stream, whatsApp connections and that's only the tip of the iceberg
You can't see records before recouping them.
3
Download 22+ File Types from iCloud Backup (iOS 10 Included)
iMyFone D-Back iCloud information Extractor or iCloud information Extractor for Mac is an iPhone information recuperation programming that concentrate current or erased iPhone, iPad and iPod information from gadget, from iCloud Backup or from iTunes Backup. It is a program that is good with both Mac and Windows and it can undoubtedly help you separate information from an iCloud reinforcement. The accompanying are a portion of the components that make it the correct apparatus for the occupation.
imyfone d-back iphone information recuperation
iMyFone D-Back iCloud Data Extractor
It bolsters extraction of record sorts, for example, instant messages, notes, recordings, photographs, WhatsApp messages, Viber messages, Kik messages, timetables and that's just the beginning.
It permits you to review records before you can extricate or recoup them.
It remove information from iTunes reinforcement and Recover from iOS gadgets specifically.
It bolsters all iPhone gadgets including iPhone 7/6s/6s Plus/6/6 Plus/5s/5c/5/4s/4.
It is good with iOS 10/9/8/7.
download-win download-macintosh
The most effective method to download iCloud reinforcement to PC with iMyFone D-Back
You can without much of a stretch download iCloud reinforcement to PC utilizing iMyFone D-Back in the accompanying ways;
Step 1: Choose recuperate from iCloud reinforcement and login
On your iMyFone D-Back program, hit on Recover from iCloud reinforcement alternative then tap on Start catch. From that point sign into your iCloud account and the program will show all the reinforcement records in your record.
Pick recuperate from iCloud reinforcement
Step 2: Select documents and Scan
From the documents showed, single out the one you need to download and tap on Next catch to filter for your iCloud reinforcement records.
Select documents and Scan
Step 3: Preview documents and Recover
When filtering is finished, experience the outcomes and select the records you need to spare to PC. Click "Recuperate" to pick an area on your PC to spare these records.
Review records and Recover
Download iMyFone D-Back iCloud information Extractor for Windows or iCloud information Extractor for Mac now to get to various sorts of information including messages, WhatsApp messages, WeChat, Photo, Video, Notes and more from an iCloud reinforcement.
Clean App Data on iPhone: Caches, Documents & Data, Junks etc
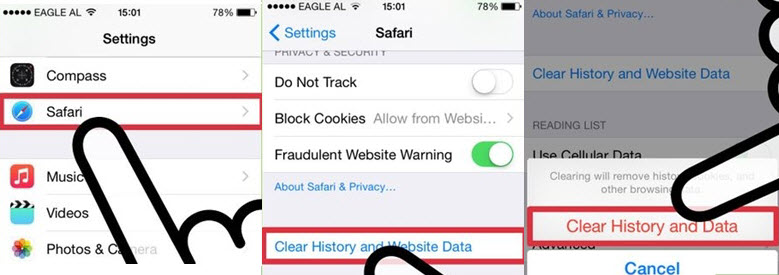
IPhone clients will constantly jump at the chance to have their gadget fit as a fiddle to continue making the most of their treasured gadget. Notwithstanding, it is critical to comprehend that application stores, records and information, trashes and so on gets to be distinctly risky to iPhones when they are not tidied up, they may prompt to iPhone performing drowsily. Along these lines, it is important to clear application information on your iPhone to free up space and appreciate better gadget execution.
DIY Method 1: Clear iOS App Data in Safari
DIY Method 2: Uninstall and Reinstall Unwanted Apps
Programming Support: Clear All Apps' Data on iPhone: Junk documents, Attachments, Texts and so forth.
DIY Method 1: Clear iOS App Data in Safari
For some implicit Apps, iOS offer the choice of erasing App information, for example, Safari, we can clear the Safari information with the assistance of the procedure which has been specified as under.
Step 1. The Settings application inside the iPhone is to be chosen to continue with the procedure. Inside the application the client needs to choose Safari.
Step 2. The Safari stores site information to guarantee that the future visits are made quick. Once the safari has been tapped on the following page, the unmistakable history and site information is to be clicked.
Step 3. At the end of the day, clear history and information is to be clicked. This affirms the activity and the procedure closes here totally.
clear application information
DIY Method 2: Uninstall and Reinstall Unwanted Apps
But Safari, for all different Apps, there is impossible in iOS that can erase these iPhone application garbage information specifically. So the quickest approach to clear up these application information is to erase these applications, and after that reinstall them. Also, the procedure is somewhat simple, you simply need to tap on the application which you need to erase, hang on until the "×" show up, tap on the "×" and you'll have the capacity to erase the application.
The bother of this strategy is that all your helpful App records and information will likewise be evacuated, including some business discussions, essential documents and so on. What's more, this is a transitory arrangement, you'll have to uninstall the Apps over and over later on.
Programming Support: Clear All App Data on iPhone: Junk records, Attachments, Texts and so forth.
Truth be told, the application information can be isolated into two classifications, one is some undetectable futile information, similar to garbage documents, transitory records, application stores and so on, the other is your noticeable individual documents, messages and connected photographs/recordings and so forth.
To spare space and lift up iPhone, clear up undetectable futile information ought to be done firstly, then we ought to manage your enormous noticeable information. What's more, iMyfone Umate Pro/iMyfone Umate Pro for Mac can do all these:
To clear undetectable App information on iPhone, you ought to swing to the cleanup choice of "Garbage Files" and "Temp Files".
To erase unmistakable iOS App information, the choices of "Photographs", "Expansive Files", "Applications" in "1-Click Free Up Space" tab can do a great deal. For more information sorts, similar to messages, contacts, connections and so on, you ought to pick "Eradicate Private Data"tab.
Moreover, after the over 2 handle completed, you are very proposed to "Eradicate Deleted Files" with Umate Pro, as erased records still exist on your iPhone before having been totally overwritten. In spite of the capacity involved by these records, if these erased documents are recuperated by others with recuperation programming, then it might prompt to security spill.
To clear iPhone application information, for example, application reserves, treats, crash logs,corrupted records and so on., the client can take after the means beneath. The procedures are computerized, the clients simply need to do a few ticks then hold up.
Step 1: Download and introduce the program. On effective establishment the program is to be propelled. The iOS gadget is then to be joined to the framework so that the program recognizes it.
Windows adaptation Mac form
Step 2: Choose the "1-Click Free Up Space" mode. At that point speedy output your iPhone.
ios erase application information
Step 3: The "Perfect" catch is then to be squeezed to clean the pointless iPhone App information.
ios erase application information
Note
iPhone is close to home, it contains numerous private information, similar to financial balance and passwords, individual photographs and recordings and so on. To ensure that nobody else could recuperation your erased touchy information with an information recuperation programming, a changeless eradication for private records and already erased documents is essential.
As an intense iPhone Cleaner, iMyfone Umate Pro can do considerably more for you iPhone/iPad/iPod Touch:
Clear up garbage files:Clear up all concealed garbage documents effectively for FREE with only a single tick, including App stores, treats, crash logs and so forth.
Clear up brief records, App reports and information: these documents aggregate as you utilize your gadget and afterward influence it adversely yet the Umate Pro clears everything to guarantee smooth running of your gadget
Diminish photograph stockpiling: for iPhone photographs, there are 2 choices to pick - pressure or mass erasure, for both alternatives, the first photographs will be went down on your PC.
Manage vast documents: distinguish every huge record more than 5MB on your iPhone and rundown all them for mass erasure.
Oversee Apps: list all applications introduced in your iPhone and rank them as indicated by their size, so you'll know plainly how much space have taken by each application for well administration.
Delete private iPhone information: Private information is required to stay private regardless of any situation and the Umate Pro is ideal for this reason. It eradicate your private information in a manner that no one can recover them.
eradicate WhatsApp: For all Whatsapp messages, connected photographs and recordings, Umate Pro can forever delete them.
Eradicate as of now erased information This is critical particularly when offering or exchanging responsibility for iPhone. Umate Pro will guarantee that your beforehand erased messages, contacts, call histories, photographs and recordings and so forth are ermanently erased, leaving no possibility of recuperation
Valuable Tips
1. What is App " Document and Data"?
This is essentially the program history, logs, treats, reserves of photographs and recordings and other database documents that are put away by the application on your report and information organizer of your gadget.
Would it be advisable for us to Clear "Archive and Data"? The appropriate response is yes on the grounds that not clearing it influences your iPhone contrarily as it gobbles up storage room making it perform slowly. Additionally, for security reasons, you have to clear them to maintain a strategic distance from information lawbreakers acquiring profitable data from them.
application record and information
2. What is iTunes "Other" Storage?
Take note of that anything put away on your IPhone that can't fit into the 8 information classifications of iTunes is delegated "Other". It is imperative to clear it since it can possess a ton of space. In any case, clearing it utilizing the Umate Pro will free up space and guarantee your gadget works ideally.
ios erase application information
It is essential to comprehend that just erasing your private iOS information utilizing the typical way is not adequate in light of the fact that it can be recouped and this jeopardizes your archive security. Notwithstanding, the best thing to do is to delete them utilizing the Umate Pro and this will ensure that your private IOS information is eradicated for all time without the danger of having it recouped utilizing information recuperation instruments. Actually, it guarantees your protection and information security.
Wednesday, February 8, 2017
Clear up iPhone to Make Your iPhone Run Faster
Method 1: Free Way to Clean up iPhone Junk Data and also Accelerate apple iphone.
Approach 2: 3 General Tips to Make iPhone Run Faster
Technique 3: A Deep apple iphone Cleaning for Area Saving & Privacy Protection
Component 1: Free Way to Clear iPhone Junk Files as well as Accelerate apple iphone
apple iphone is one of the fastest smartphones on the planet, however as smooth as the iphone individual experience is in general, some individuals discover that their iPhone is obtaining sluggish each day. Why? As the moment passes, the unwanted junk documents developed by different applications become more and more, these concealed or visible scrap and temporary documents make your apple iphone memory bulky and slow-moving your apple iphone
So, ways to make your apple iphone faster? There is no simple method by default to get rid of these unneeded data. There are constantly some method to optimize it.
iMyFone Umate Pro or iMyFone Umate Pro for Mac could cleanse over 30 sorts of concealed iphone junk documents in just 1-click. It could get rid of app caches/cookies/temp files/crash logs, as well as corrupted data. And these are the FREE feature of Umate Pro, you do not should pay for it. Comply with the steps to clean up your apple iphone and make your apple iphone run much faster!
Windows version Mac variation
Make Your apple iphone Faster with iMyfone Umate
Action 1: Run the program as well as attach your iDevice to your COMPUTER or MAC via USB cord.
connect iPhone
Action 2: Click "Quick Scan". After that" iMyFone Umate" will begin checking your gadget for all unwanted junk documents.
check iPhone
Action 3: When Check is full, Umate will certainly show all your scrap files, you could choose as well as remove those files to enhance your iPhone efficiency.
make iphone run faster
Generally, if the iPhone have been used for very long time without cleaning up, then you can conserve enormous area by clear up junk data.
Component 2: 3 General Tips making iPhone Run Faster
Most likely to Setups -> Messages -> Maintain Message. Currently you can pick time for which you intend to maintain your conversations. Erasing sms message and multimedia files can maximize iPhone area and enhance the performance of your apple iphone.
Activate vehicle updates all the times could make your apple iphone slow-moving since it might attempting to update any type of application behind-the-scenes. So shutting off your vehicle updates will guarantee that your apple iphone will certainly never lag because of background updates.
Tips
You could additionally do this with Umate Pro which could mass delete all iPhone messages in 1-click, it could also permanently eliminate the iMessages that you have actually deleted in the past however still exist in you tool, such documents could be conveniently recuperated by wrong hands, to avoid personal privacy leak, we 'd better erase them.
Pointer 3. Shut off Vehicle Updates
If you don't erase your text discussions typically, and have actually stored too many messages on your apple iphone, they could impact efficiency of your iPhone.
There is a feature in iOS that sustains background task for different applications. Turning off this feature will definitely make iPhone run faster. Adhering to the actions to disable history App refresh.
Action 1. Open up Establishing > General.
Step 2. Search for "Background Application Refresh" toggle to switch off this attribute.
Action 3. Now leave setting, and also your gadget will function smoother.
disable history application
Suggestion 2. Erase Old Sms message
Idea 1. Disable History Application Refresh
The majority of us are making use of iphone 9 or iOS 10 on their apples iphone, iPads as well as iPods. Lots of individual report that their iDevices obtain slow by revealing lag as well as delay in action for interface. There are couple of basic options discussed listed below.
In order to turn off car updates, go to Setups- > iTunes & App Shop -> updates. Toggle updates choice to shut off Car updates.
Part 3: A Deep iPhone Clean-up for Area Conserving & Privacy Defense
While all these pointers above can assist to enhance iPhone performance, it do have some disadvantages. As opposed to quiting auto updates and erasing text messages that do not matter, iMyfone Umate Pro could erase pointless data such as short-term data, junk files, manage big media files/ applications that inhabit a huge piece of memory and also reduce efficiency, and also permanently eliminate private data & formerly removed files to avoid personal privacy leak.
Clear up junk & momentary documents is just a fundamental clean-up, if intend to offer your iPhone a deep cleanup, there are still a lot to do.
1
Fisrt of All, Get rid of iPhone Deleted Data
But, mostly, we erase documents due to the fact that we do not require them or because they are sensitive data. Instead of allowing these data exist on your apple iphone as well as eat up your space, we would certainly much better completely eliminate them. By doing this, you could not only make your apple iphone run much faster, but also safeguard your personal privacy.
Most of us recognize that there are many data recuperation software for iPhone, yet why they can do it? Due to the fact that the data deleted in regular ways still exist on your apple iphone before having been entirely overwritten. So these documents can be recuperated easily.
How to Delete Apps/ App Data from iCloud
With individuals downloading numerous applications on their apple iphone, area has the tendency to fill up instead swiftly. Given that all the apps as well as their information is synced via iCloud, as well as the details saved in cache memory. While, you won't find a lot of area being used up, it can cause pointless information being minimized your iCloud account. Apple does not offer a direct delete attribute to its individuals when it comes to erasing apps from iCloud, nonetheless, you can still hide them.
How you can Conceal Unwanted Apps from iCloud

To delete applications from iCloud via iPhone, users could likewise select iMyFone Umate Pro which is an extremely efficient information eliminating program. There are 4 information elimination settings including a fast tidy scan that will certainly not just erase scrap and also momentary files but additionally compress huge ones, mass remove photos/videos/apps to raise storage space. If you are planning to run your iPhone at optimal capability, this is exactly what you need to choose.
Action 1. Go to the Application shop on your apple iphone as well as open updates.
Step 2. Faucet on Acquired.
Action 3. On your Mac, open up iTunes and also click on the purchased alternative there too.
Step 4. You will see a history of all the applications downloaded.
Step 5. Area the computer mouse reminder over the application that you intend to hide and also click "X" which will certainly appear.
Step 6. Your application list will be upgraded as well as you can examine it on your apple iphone.
Ways to Erase Data That Apps Stored in iCloud
You need to remember that all your data from the downloaded applications is mosting likely to be kept on iCloud. In some cases, this could bring about aggravation for the individual as there personal information could be integrated with the data from applications. It could position a safety and security threat as well as occupy a lot of room as for total storage is concerned. Even if you have erased the applications that you do not need anymore, the data from those will certainly still continue to be with iCloud.
In order to merely erase the application information from iCloud, you could:
erase application from iCloud.
These steps will additionally erase the application from your iPhone, and also if you want to use it once again, you should reinstall it. This is actually monotonous, as once reinstall the application, it begins to save data and also caches again, so you must to remove & re-install the application repeatedly. Just what's more, the information removed by doing this could still be recovered with the recovery software, so, to make the all the procedure simple and also still for personal privacy defense, you could select iMyFone Umate Pro and also start a cleaning to clear app data. You'll have the selection of 4 major information eliminating settings which make sure that all data is completely eliminated and can not be recovered by any kind of exterior program.
Action 2. After that touch on Storage as well as Back-up. After pressing on Manage Storage space, individuals can look under Files and Information.
Action 3. You can choose the app that you want to remove the data for.
Tip 4. Press Edit and also Tap delete.
Tip 5. Confirm the action.
Action 1. Go to Setups and Press iCloud
Permanently Remove Application/ Application Data from iCloud through apple iphone
Even those who routinely update their apples iphone and erase all their data risk of their data being recuperated by a 3rd party. When you remove a file from your iPhone, there is a wonderful possibility of it being stored someplace in the memory, that makes it available to any individual that runs a recovery program.
This is why one has to guarantee that their deleted documents are gone permanently and also can not be recuperated whatsoever. iMyFone Umate Pro or iMyFone Umate Pro for Mac allows users to have complete peace of mind as for information removal is worried. It provides fool evidence security against safety and security breaches as well as healing software program. There are four information eliminating settings to choose from:
Windows variation Mac version
remove application from iCloud
A quick clean-up which includes a smart check that can result in the scrap documents, short-lived data, application caches being eliminated and also bulk remove videos/photos/apps. This is excellent for raising efficiency and rate of the tool.
The Erase deleted documents is the very best choice for individuals that want their removed photos, video clips or other details gone completely. Everything will certainly be secure as well as secured from healing tools.
Erase all data resembles a manufacturing facility reset option as well as transforms your iPhone to its initial settings. All the saved details as well as information will be erased forever without any opportunity to be recuperated.
Remove exclusive data permits users to selectively preview data and afterwards get rid of the picked ones. Any kind of kind of secret information as soon as removed will not be recouped.
To erase app/app information from iCloud, you just have to run the program > select "1-click maximize" from the tab:
delete application from iCloud
Erase apps from iCloud through apple iphone: select "Applications" > choose the apps as well as erase them in 1-click.
Delete applications data from iCloud via apple iphone: choose "scrap documents" > remove them in 1-click.
Those that intend to completely erase their data from the apple iphone could initiate the erase deleted files setting. This will ensure that all the formerly removed documents which were prone to recuperation are gone completely and also there is no risk to them any longer.
Subscribe to:
Comments (Atom)